Guardian Druid Compendium
Written by: Kitch
News
Tuning Pass 25/3
- A second tuning pass has come and wiht it, more Guardian nerfs. This one looks to be for around 15% single target, which ultimately puts us roughly in line with the other tank specs - likely still sitting towards the top end of the scale.
Tuning Pass 17/3
The initial pre-heroic tuning pass has hit us pretty hard. Some of the wording of the blue post is a bit ambiguous in how the nerf will change the spell data, but with a couple of minor assumptions, the tuning pass leaves us with:
-
DotC single target roughly a 35% nerf. Going from around 120k sim dps in max gear to 75k.
-
EC single target roughly a 15% nerf. Going from around 100k sim dps in max gear to 85k.
-
In AoE both of the nerfs are less significant than they are for single target.
Midnight Season 1 Tier Set
2-Piece
Very straightforward effect. The damage increase itself roughly works out to be around 4-5%
4-Piece
Maul /
Raze /
Ravage have a 5% increased chance to activate
Galactic Guardian.
Moonfire's periodic damage has a chance to make your next
An interesting little feedback loop for the 4p. Using more of our offensive spenders triggers more free ![]() Moonfire from
Moonfire from ![]() Galactic Guardian which effectively gives us more offensive spenders. Because of the relative power of
Galactic Guardian which effectively gives us more offensive spenders. Because of the relative power of ![]() Maul /
Maul / ![]() Raze /
Raze / ![]() Ravage in Midnight this effect alone roughly equates to a %%%% gain.
Ravage in Midnight this effect alone roughly equates to a %%%% gain.
In total our set bonus is about as solid as season 1 tier sets get, netting us around another 3% on top of the 2p bonus. Worth noting, the only real defensive aspect that comes from this set is the increase to ![]() Ursoc's Fury shielding and potentially the increased reliability of
Ursoc's Fury shielding and potentially the increased reliability of ![]() Moonfire spreading if you're running Scintillating Moonlight.
Moonfire spreading if you're running Scintillating Moonlight.
Rotation
NOTE
The rotations below are purely about damage dealing. For further information on potential nuance for the rotations with regards to survivability please read the follow-up sections (primarily Ironfur and Defensives)
Before going into the rotations for the specs, here are a few common questions about how the rotations work and some specific terminology that not all will be familiar with:
What is a priority list?
When reading the rotations below, you should not think about them as steps to follow in a specific order. At any given point in combat, you should cast the highest priority thing on the list that you are able to cast, providing any stated conditions are met.
What does Pandemic mean in WoW?
Pandemic is an in-game mechanic where most damage over time (DoT) or heal over time (HoT) effects can have their duration extended by up to 30% if they are refreshed with less than 30% remaining on their duration. For example, if a DoT is ten seconds long you could refresh it at 3 seconds (30% of 10 seconds) and the total duration of the debuff would increase to 13 seconds, meaning that no duration of the spell cast is wasted. If a ten second dot is refreshed at 8 seconds then the total duration of the debuff would also increase to 13 seconds, but this would mean you lose 5 seconds of the debuff compared to if you cast it in the pandemic window.
What is Ripweaving and Catweaving?
WARNING
Currently neither Ripweaving nor Catweaving are a dps gain so they're not really worth doing unless you just enjoy the rotation more.
It is always assumed that if you're Ripweaving or Catweaving that you have ![]() Fluid Form talented and are using it as your method to change forms.
Fluid Form talented and are using it as your method to change forms.
Those of you looking into Druid of the Claw specifically may come across these terms. Catweaving is a fairly old term in WoW but with the introduction of some key talents in The War Within it has evolved into something different from what it used to be. The current meaning of these terms roughly boil down to:
- Ripweaving - This is a simplified form of Catweaving. It involves using a very standard Guardian rotation the vast majority of the timne but when you reach six stacks of Feline Potential (from the DotC node
 Wildpower Surge) you will quickly enter
  Cat Form (ideally, using
  Fluid Form), use the empowered finisher and then quickly return to
  Bear Form.
 - Catweaving This is the more advanced and modernised version of Catweaving and no longer does it involve "just using cat stuff when offtanking". Modern Catweaving abuses Fluid Form, Persistence and
 Empowered Shapeshifting to frequently shift in and out of Cat Form whilst both tanking and offtanking,
allowing us to replace our weak filler spells (primarily Swipe) with stronger Cat abilities (
Empowered Shapeshifting to frequently shift in and out of Cat Form whilst both tanking and offtanking,
allowing us to replace our weak filler spells (primarily Swipe) with stronger Cat abilities ( Rake,
Rake,  Shred,
  Rip and
  Ferocious Bite).
Druid of the Claw
- Make sure the duration of your Flask, Food and Rune buffs will last for the entire encounter.
- Enter Bear Form a few seconds before you pull
- Press
 Growl and
  Lunar Beam to pull
 - Press Growl and Moonfire to pull
- Press Rake to enter Cat Form
- Use your combat potion (usually
 Light's Potential
 - Press
 Heart of the Wild
 - Immediately press
 Incarnation: Guardian of Ursoc
- Incarnation: Guardian of Ursoc isn't on the GCD so you can do instantly after Heart of the Wild goes on cooldown with no delay
- Do not recast your Wild Guardian's from this point until immediately before you are going to cast Ravage after this opening sequence
- Immediately press
 Berserk
- Berserk isn't on the GCD so you can do instantly after Heart of the Wild goes on cooldown with no delay
- Do not recast your Wild Guardian's from this point until immediately before you are going to cast Ravage after this opening sequence
- Press
 Thrash
 - Press Sundering Roar
- Press Thrash
- Immediately press Incarnation: Guardian of Ursoc and use your combat potion (usually Light's Potential
- Incarnation: Guardian of Ursoc isn't on the GCD so you can do instantly after Heart of the Wild goes on cooldown with no delay
- Do not recast your Wild Guardian's from this point until immediately before you are going to cast Ravage after this opening sequence
- Immediately press Berserk and use your combat potion (usually Light's Potential
- Berserk isn't on the GCD so you can do instantly after Heart of the Wild goes on cooldown with no delay
- Do not recast your Wild Guardian's from this point until immediately before you are going to cast Ravage after this opening sequence
- Press Thrash
- Presss Red Moon
- Proceed with normal rotation
- Press Ravage if available and above 60 rage
- With Harnessed Rage, casting above 80 rage is ideal but it is not worth delaying the Ravage cast past 60 rage
- With Harnessed Rage, casting above 80 rage is ideal but it is not worth delaying the
- Press Ravage if available
- Press
 Mangle if available and Red Moon is on the target
 - Press Thrash if not at max stacks of the debuff or if it is about to expire
- Press Moonfire if the dot completely falls off
- Press Maul if you're above 100 rage to not overcap
- Press Raze if you're above 100 rage to not overcap
- Press Lunar Beam
- You can hold every second use of this to sync with Incarnation: Guardian of Ursoc
- You will want sync every third use of this with Berserk
- You can hold every second use of this to sync with
- If Heart of the Wild is not on cooldown, perform the sequence below:
- When you reach six stacks of Feline Potential then follow this sequence:
- Press Sundering Roar
- Press
 Convoke the Spirits
 - Cast Bristling Fur if the following are true:
- Press Incarnation: Guardian of Ursoc
- Take a look at the Incarn/Berserk Rotation section to see any rotational changes and when to use Wild Guardians
- Press Berserk
- Take a look at the Incarn/Berserk Rotation section to see any rotational changes and when to use Wild Guardians
- Cast Red Moon
- Press Mangle if available
- Press Thrash if available
- Press Moonfire if you have a Galactic Guardian proc
- Press
 Swipe if you have nothing else to press
- Cast Ravage at your priority target if available and above 60 rage
- With Harnessed Rage, casting above 80 rage is ideal but it is not worth delaying the Ravage cast past 60 rage
- With Harnessed Rage, casting above 80 rage is ideal but it is not worth delaying the
- Press Ravage at your priority target if available
- Press Mangle if available and Red Moon is on the target
- Press Thrash if not at max stacks of the debuff or if it is about to expire
- Press Moonfire if the dot completely falls off
- Cast Maul at your priority target if you're above 100 rage to not overcap
- Cast Raze at your priority target if you're above 100 rage to not overcap
- Press Lunar Beam
- You can hold every second use of this to sync with Incarnation: Guardian of Ursoc
- You will want to sync every third use of this with Berserk
- You can hold every second use of this to sync with
- If Heart of the Wild is off cooldown, perform the sequence below:
- Press Sundering Roar
- Press Convoke the Spirits
- Cast Bristling Fur if the following are true:
- Press Incarnation: Guardian of Ursoc
- Take a look at the Incarn/Berserk Rotation section to see any rotational changes and when to use Wild Guardians
- Press Berserk
- Take a look at the Incarn/Berserk Rotation section to see any rotational changes and when to use Wild Guardians
- Cast Red Moon
- Press Mangle if available
- Press Thrash if available
- Press Moonfire if you have a Galactic Guardian proc
- Press Swipe if you have nothing else to press
- Cast Ravage at your priority target if available and above 60 rage
- With Harnessed Rage, casting above 80 rage is ideal but it is not worth delaying the Ravage cast past 60 rage
- With Harnessed Rage, casting above 80 rage is ideal but it is not worth delaying the
- Press Ravage at your priority target if available
- Press Mangle if available and Red Moon is on the target
- Press Thrash if not at max stacks of the debuff or if it is about to expire
- Press Moonfire if the dot completely falls off
- Cast Maul at your priority target if you're above 100 rage to not overcap
- Cast Raze at your priority target if you're above 100 rage to not overcap
- Press Lunar Beam
- You can hold every second use of this to sync with Incarnation: Guardian of Ursoc
- You will want to sync every third use of this with Berserk
- You can hold every second use of this to sync with
- If Heart of the Wild is off cooldown, perform one of the two sequences below:
- For significant priority damage at any target count, you would:
- If at 6+ target, for maximum aoe damage you would:
- Manually shift into
 Moonkin Form
 - Press Heart of the Wild immediately Mangle your priority target to get back to Bear Form
- If you have no Mangle charges or if no target is in range to mangle, it is a dps gain to manually switch back to Bear Form
- Manually shift into
- Press Sundering Roar
- Press Convoke the Spirits
- Press Incarnation: Guardian of Ursoc
- Take a look at the Incarn/Berserk Rotation section to see any rotational changes and when to use Wild Guardians
- Press Berserk
- Take a look at the Incarn/Berserk Rotation section to see any rotational changes and when to use Wild Guardians
- Cast Red Moon
- Press Mangle if available
- Press Thrash if available
- Press Swipe if you have nothing else to press
During ![]() Incarnation: Guardian of Ursoc/
Incarnation: Guardian of Ursoc/![]() Berserk we follow a slightly different priority system which is described below.
Berserk we follow a slightly different priority system which is described below.
- Do not press Wild Guardians until you have a Ravage proc ready to cast then press it immediately before you use the Ravage.
- Press Ravage if available and above 60 rage
- Press Ravage if available
- Cast Ravage at your priority target if available and above 60 rage
- Press Ravage at your priority target if available
- Cast Mangle if Red Moon is on your target
- Cast Mangle if Red Moon is on your priority target
- Cast Lunar Beam if it becomes available
- Ideally, this would've been pressed before you use Incarnation: Guartdian of Ursoc but if it is desyned, it is still worth pressing immediately.
- Ideally, this would've been pressed before you use Berserk but if it is desyned, it is still worth pressing immediately.
- Cast Lunar Beam on your priority target if it becomes available
- Ideally, this would've been pressed before you use Incarnation: Guartdian of Ursoc but if it is desyned, it is still worth pressing immediately.
- Ideally, this would've been pressed before you use Berserk but if it is desyned, it is still worth pressing immediately.
- If Heart of the Wild becomes available, wait for all of your Maul charges for Wild Guardians to be consumed, then follow this sequence:
- Cast Maul regardless of rage
- If enough rage remains after this, consume it with an
 Ironfur
- If enough rage remains after this, consume it with an
- Press Rake to shift into Cat Form
- Press Heart of the Wild on your priority target and then immediately Mangle to get back to Bear Form
- (This sequence would ideally be done before Incarnation: Guardian of Ursoc but Heart of the Wild is too powerful to significantly delay if a desync occurs)
- (This sequence would ideally be done before Berserk but Heart of the Wild is too powerful to significantly delay if a desync occurs)
- Cast
- If Heart of the Wild becomes available, wait for all of your Raze charges for Wild Guardians to be consumed, then follow this sequence:
- Cast Raze regardless of rage
- If enough rage remains after this, consume it with an Ironfur
- If enough rage remains after this, consume it with an
- Press Rake to shift into Cat Form
- Press Heart of the Wild on your priority target and then immediately Mangle to get back to Bear Form
- (This sequence would ideally be done before Incarnation: Guardian of Ursoc but Heart of the Wild is too powerful to significantly delay if a desync occurs)
- (This sequence would ideally be done before Berserk but Heart of the Wild is too powerful to significantly delay if a desync occurs)
- Cast
- If Heart of the Wild becomes available, wait for all of your Maul charges for Wild Guardians to be consumed, then follow this sequence:
- Cast Maul on your priority target, regardless of rage
- If enough rage remains after this, consume it with an Ironfur
- If enough rage remains after this, consume it with an
- Press Rake to shift into Cat Form
- Press Heart of the Wild on your priority target and then immediately Mangle to get back to Bear Form
- (This sequence would ideally be done before Incarnation: Guardian of Ursoc but Heart of the Wild is too powerful to significantly delay if a desync occurs)
- (This sequence would ideally be done before Berserk but Heart of the Wild is too powerful to significantly delay if a desync occurs)
- Cast
- If Heart of the Wild becomes available, wait for all of your Raze charges for Wild Guardians to be consumed, then follow this sequence:
- Press Raze on your priority target, regardless of rage
- If enough rage remains after this, consume it with an Ironfur
- If enough rage remains after this, consume it with an
- Press Rake to shift into Cat Form
- Press Heart of the Wild on your priority target and then immediately Mangle to get back to Bear Form
- (This sequence would ideally be done before Incarnation: Guardian of Ursoc but Heart of the Wild is too powerful to significantly delay if a desync occurs)
- (This sequence would ideally be done before Berserk but Heart of the Wild is too powerful to significantly delay if a desync occurs)
- Press
- If Heart of the Wild becomes available, it is only worth using if you need further priority damage.
- Wait for all of your Maul charges for Wild Guardians to be consumed, then follow this sequence:
- Cast Maul on your priority target, regardless of rage
- If enough rage remains after this, consume it with an Ironfur
- If enough rage remains after this, consume it with an
- Press Rake to shift into Cat Form
- Press Heart of the Wild on your priority target and then immediately Mangle to get back to Bear Form
- (This sequence would ideally be done before Incarnation: Guardian of Ursoc but Heart of the Wild is too powerful to significantly delay if a desync occurs)
- (This sequence would ideally be done before Berserk but Heart of the Wild is too powerful to significantly delay if a desync occurs)
- Cast
- If Heart of the Wild becomes available, it is only worth using if you need further priority damage.
- Wait for all of your Raze charges for Wild Guardians to be consumed, then follow this sequence:
- Press Raze on your priority target, regardless of rage
- If enough rage remains after this, consume it with an Ironfur
- If enough rage remains after this, consume it with an
- Press Rake to shift into Cat Form
- Press Heart of the Wild on your priority target and then immediately Mangle to get back to Bear Form
- (This Heart of the Wild sequence would ideally be done before Incarnation: Guardian of Ursoc)
- (This Heart of the Wild sequence would ideally be done before Berserk)
- Press
- Cast Red Moon
- Cast Red Moon on your priority target
- Cast Maul if above 100 rage
- Cast Maul on your priortity target if above 100 rage
- Cast Raze if above 100 rage
- Cast Raze on your priority target if above 100 rage
- Cast Mangle
- Cast Thrash
Elune's Chosen
- Make sure the duration of your Flask, Food and Rune buffs will last for the entire encounter.
- Enter Bear Form a few seconds before you pull
- Press Growl and Lunar Beam to pull
- Press Growl and Moonfire to pull
- Press Rake to enter Cat Form
- Use your combat potion (usually Light's Potential
- Press Heart of the Wild
- Immediately press Incarnation: Guardian of Ursoc
- Incarnation: Guardian of Ursoc isn't on the GCD so you can do instantly after Heart of the Wild goes on cooldown with no delay
- You can freely recast Wild Guardians whenever, but lining it up with increased damage windows is always a strong option.
- Immediately press Berserk
- Berserk isn't on the GCD so you can do instantly after Heart of the Wild goes on cooldown with no delay
- You can freely recast Wild Guardians whenever, but lining it up with increased damage windows is always a strong option.
- Press Thrash to take advantage of the cooldown reset to reach higher Thrash stacks faster
- Press Sundering Roar
- Press Thrash to take advantage of the cooldown reset to reach higher Thrash stacks faster
- Immediately press Incarnation: Guardian of Ursoc and use your combat potion (usually Light's Potential
- Incarnation: Guardian of Ursoc isn't on the GCD so you can do instantly after Heart of the Wild goes on cooldown with no delay
- You can freely recast Wild Guardians whenever, but holding lining it up with increased damage windows is always a strong option.
- Immediately press Berserk and use your combat potion (usually Light's Potential
- Berserk isn't on the GCD so you can do instantly after Heart of the Wild goes on cooldown with no delay
- You can freely recast Wild Guardians whenever, but lining it up with increased damage windows is always a strong option.
- Press Thrash
- Presss Red Moon
- Proceed with normal rotation
- Press Mangle if available and Red Moon is on the target
- Press Thrash if not at max stacks of the debuff or if it is about to expire
- Press Moonfire if the dot completely falls off
- Press Maul if you're above 100 rage to not overcap
- Press Raze if you're above 100 rage to not overcap
- Press Lunar Beam. It is worth holding this for a few seconds to sync it with Red Moon if possible
- Your aim is to sync this with as many Red Moons as possible and then line up every ~4th with Incarnation: Guardian of Ursoc
- Your aim is to sync this with as many Red Moons as possible and then line up every ~6th with Berserk
- Your aim is to sync this with as many Red Moons as possible and then line up every ~4th with
- If Heart of the Wild is off cooldown, perform the sequence below:
- Press Sundering Roar
- Press Convoke the Spirits
- Cast Bristling Fur if the following are true:
- Press Incarnation: Guardian of Ursoc
- Take a look at the Incarn/Berserk Rotation section to see any rotational changes and when to use Wild Guardians
- Press Berserk
- Take a look at the Incarn/Berserk Rotation section to see any rotational changes and when to use Wild Guardians
- Cast Red Moon
- Press Mangle if available
- Press Thrash if available
- Press Moonfire if you have a Galactic Guardian proc
- Press Swipe if you have nothing else to press
- Press Mangle if available and Red Moon is on the target
- Press Thrash if not at max stacks of the debuff or if it is about to expire
- Press Moonfire if the dot completely falls off
- Cast Maul at your priority target if you're above 100 rage to not overcap
- Cast Raze at your priority target if you're above 100 rage to not overcap
- Press Lunar Beam. It is worth holding this for a few seconds to sync it with Red Moon if possible
- Your aim is to sync this with as many Red Moons as possible and then line up every ~4th with Incarnation: Guardian of Ursoc
- Your aim is to sync this with as many Red Moons as possible and then line up every ~6th with Berserk
- Your aim is to sync this with as many Red Moons as possible and then line up every ~4th with
- If Heart of the Wild is off cooldown, perform one of the two sequences below:
- For significant priority damage at any target count, you would:
- If at 6+ target, for maximum aoe damage you would:
- Manually shift into Moonkin Form
- Press Heart of the Wild immediately Mangle your priority target to get back to Bear Form
- If you have no Mangle charges or if no target is in range to mangle, it is a dps gain to manually switch back to Bear Form
- Manually shift into
- Press Sundering Roar
- Press Convoke the Spirits
- Press Incarnation: Guardian of Ursoc
- Take a look at the Incarn/Berserk Rotation section to see any rotational changes and when to use Wild Guardians
- Press Berserk
- Take a look at the Incarn/Berserk Rotation section to see any rotational changes and when to use Wild Guardians
- Cast Red Moon
- Press Mangle if available
- Press Thrash if available
- Press Swipe if you have nothing else to press
During ![]() Incarnation: Guardian of Ursoc/
Incarnation: Guardian of Ursoc/![]() Berserk we follow a slightly different priority system which is described below.
Berserk we follow a slightly different priority system which is described below.
- If a damage amp is coming up you will want to hold your Wild Guardians recast until it happens - buffing this is a significant damage gain.
- Cast Mangle if Red Moon is on your target
- Cast Mangle if Red Moon is on your priority target
- Cast Lunar Beam if it becomes available
- Ideally, this would've been pressed before you use Incarnation: Guartdian of Ursoc but if it is desyned, it is still worth pressing immediately.
- Ideally, this would've been pressed before you use Berserk but if it is desyned, it is still worth pressing immediately.
- Cast Lunar Beam on your priority target if it becomes available
- Ideally, this would've been pressed before you use Incarnation: Guartdian of Ursoc but if it is desyned, it is still worth pressing immediately.
- Ideally, this would've been pressed before you use Berserk but if it is desyned, it is still worth pressing immediately.
- If Heart of the Wild becomes available, wait for all of your Maul charges for Wild Guardians to be consumed, then follow this sequence:
- Cast Maul regardless of rage
- If enough rage remains after this, consume it with an Ironfur
- If enough rage remains after this, consume it with an
- Press Rake to shift into Cat Form
- Press Heart of the Wild on your priority target and then immediately Mangle to get back to Bear Form
- (This sequence would ideally be done before Incarnation: Guardian of Ursoc but Heart of the Wild is too powerful to significantly delay if a desync occurs)
- (This sequence would ideally be done before Berserk but Heart of the Wild is too powerful to significantly delay if a desync occurs)
- Cast
- If Heart of the Wild becomes available, wait for all of your Raze charges for Wild Guardians to be consumed, then follow this sequence:
- Cast Raze regardless of rage
- If enough rage remains after this, consume it with an Ironfur
- If enough rage remains after this, consume it with an
- Press Rake to shift into Cat Form
- Press Heart of the Wild on your priority target and then immediately Mangle to get back to Bear Form
- (This sequence would ideally be done before Incarnation: Guardian of Ursoc but Heart of the Wild is too powerful to significantly delay if a desync occurs)
- (This sequence would ideally be done before Berserk but Heart of the Wild is too powerful to significantly delay if a desync occurs)
- Cast
- If Heart of the Wild becomes available, wait for all of your Maul charges for Wild Guardians to be consumed, then follow this sequence:
- Cast Maul on your priority target, regardless of rage
- If enough rage remains after this, consume it with an Ironfur
- If enough rage remains after this, consume it with an
- Press Rake to shift into Cat Form
- Press Heart of the Wild on your priority target and then immediately Mangle to get back to Bear Form
- (This sequence would ideally be done before Incarnation: Guardian of Ursoc but Heart of the Wild is too powerful to significantly delay if a desync occurs)
- (This sequence would ideally be done before Berserk but Heart of the Wild is too powerful to significantly delay if a desync occurs)
- Cast
- If Heart of the Wild becomes available, wait for all of your Raze charges for Wild Guardians to be consumed, then follow this sequence:
- Press Raze on your priority target, regardless of rage
- If enough rage remains after this, consume it with an Ironfur
- If enough rage remains after this, consume it with an
- Press Rake to shift into Cat Form
- Press Heart of the Wild on your priority target and then immediately Mangle to get back to Bear Form
- (This sequence would ideally be done before Incarnation: Guardian of Ursoc but Heart of the Wild is too powerful to significantly delay if a desync occurs)
- (This sequence would ideally be done before Berserk but Heart of the Wild is too powerful to significantly delay if a desync occurs)
- Press
- If Heart of the Wild becomes available, it is only worth using if you need further priority damage.
- Wait for all of your Maul charges for Wild Guardians to be consumed, then follow this sequence:
- Cast Maul on your priority target, regardless of rage
- If enough rage remains after this, consume it with an Ironfur
- If enough rage remains after this, consume it with an
- Press Rake to shift into Cat Form
- Press Heart of the Wild on your priority target and then immediately Mangle to get back to Bear Form
- (This sequence would ideally be done before Incarnation: Guardian of Ursoc but Heart of the Wild is too powerful to significantly delay if a desync occurs)
- (This sequence would ideally be done before Berserk but Heart of the Wild is too powerful to significantly delay if a desync occurs)
- Cast
- If Heart of the Wild becomes available, it is only worth using if you need further priority damage.
- Wait for all of your Raze charges for Wild Guardians to be consumed, then follow this sequence:
- Press Raze on your priority target, regardless of rage
- If enough rage remains after this, consume it with an Ironfur
- If enough rage remains after this, consume it with an
- Press Rake to shift into Cat Form
- Press Heart of the Wild on your priority target and then immediately Mangle to get back to Bear Form
- (This Heart of the Wild sequence would ideally be done before Incarnation: Guardian of Ursoc)
- (This Heart of the Wild sequence would ideally be done before Berserk)
- Press
- Cast Red Moon
- Cast Red Moon on your priority target
- Cast Maul if above 100 rage
- Cast Maul on your priortity target if above 100 rage
- Cast Raze if above 100 rage
- Cast Raze on your priority target if above 100 rage
- Cast Mangle
- Cast Thrash
Ironfur
![]() Ironfur is your active mitigation as a Guardian Druid.
Ironfur is your active mitigation as a Guardian Druid. ![]() Ironfur costs 40 rage, and each application of
Ironfur costs 40 rage, and each application of ![]() Ironfur increases your armour by 112% of your agility.
Ironfur increases your armour by 112% of your agility.
You hit the armour cap at 85% physical mitigation, so roughly 5-6 stacks (4-5 with an augmentation evoker) will allow you to reach the armour cap, after which, more ![]() Ironfur does nothing except effectively refresh the duration.
Ironfur does nothing except effectively refresh the duration.
How To Use Ironfur
Frequently people ask "how many ![]() Ironfur stacks should I have for X" which whilst simple to grasp, isn't the best way to think about
Ironfur stacks should I have for X" which whilst simple to grasp, isn't the best way to think about ![]() Ironfur / our spenders. The general aim with
Ironfur / our spenders. The general aim with ![]() Ironfur is to use as much or as little as you need to smooth out the damage of whatever physical damage you're taking - it's a dynamic mitigation system, needing more investment at some points and less (or even none) at others.
Ironfur is to use as much or as little as you need to smooth out the damage of whatever physical damage you're taking - it's a dynamic mitigation system, needing more investment at some points and less (or even none) at others.
A simple analogy to help with this idea is to follow the Goldilocks principle:
- Too much Ironfur means you'll smooth out any physical damage really well, but comes with the downside that you won't have much to spend offensively. The most common issue this could lead to is threat issues as mobs keep getting ripped off of you by your dps or co-tank.
- Too little Ironfur means you'll have a significant amount of rage that could be spent offensively via Maul / Raze / Ravage but can also cause issues in that any physical damage you do take, may not be smoothed out very well; leading to a spiky hp bar, overcommitting defensives to compensate or just drop dieing to damage you weren't expecting.
- Having enough Ironfur to smooth out your damage intake, whilst still having rage to spend offensively gives you the best of both of these situations.
It's about finding a balance, something that's relatively simple in concept but takes a fair amount of experience and knowledge with different encounters damage patterns to really figure out.
Defensive Usage
In addition to ![]() Ironfur, which is our active mitigation (meaning it should basically be active all of the time that we are tanking mobs and taking physical damage) Guardian has a plethora of limited window Cooldowns which also significantly aid our survivability. The main way that defensive cooldowns function is by increasing our Effective Health Pool (EHP). EHP is a measure of how much damage we can take whilst also factoring any damage reduction or resistances we have, E.g. if someone has 1 million health, but takes 50% reduced damage then they can actually take 2 million damage before dying. That would make their EHP 2 million, which is obviously a big increase from their Raw Health Pool (1 million in this scenario).
Ironfur, which is our active mitigation (meaning it should basically be active all of the time that we are tanking mobs and taking physical damage) Guardian has a plethora of limited window Cooldowns which also significantly aid our survivability. The main way that defensive cooldowns function is by increasing our Effective Health Pool (EHP). EHP is a measure of how much damage we can take whilst also factoring any damage reduction or resistances we have, E.g. if someone has 1 million health, but takes 50% reduced damage then they can actually take 2 million damage before dying. That would make their EHP 2 million, which is obviously a big increase from their Raw Health Pool (1 million in this scenario).
Cooldowns for Guardian work in two primary ways but both fulfil the criteria of increasing our EHP. They will either reduce the damage that we take for their duration in some way and/or massively increase our hp for the duration, often doing this with some additional benefits. Our main Defensive cooldowns are:
These defensive's should primarily be used in a way that enables us to survive through an encounter but as mentioned, several do come with additional benefits. For example, ![]() Lunar Beam will increase our mastery, which increased our hp pool which increases our survivability. However, it will also increase our damage done because mastery increases our attack power. This sort of offensive and defensive benefit is also very common with tank spec trinkets.
Lunar Beam will increase our mastery, which increased our hp pool which increases our survivability. However, it will also increase our damage done because mastery increases our attack power. This sort of offensive and defensive benefit is also very common with tank spec trinkets.
Because of this Offensive and Defensive duality that many cooldowns possess we need to factor in both sides of them when planning for an encounter. The general goals for any encounter should be:
- Cover all major/threatening damage events (typically tank busters) with an adequate cooldown.
- It is usually not advised to use multiple defensive cooldowns to cover a single damage event due to how they interact with each other (see below).
- Aim to cover as many individual damage events as possible by having some form of cooldown active and "rolling" into the next one as the first expires.
- Prioritise getting as many uses of your multi-purpose cooldowns as possible.
- E.g. if you have a choice between using
 Survival Instincts and
  Barkskin to cover a tank buster, it would be ideal to use Barkskin since it may provide some form damage benefit due to
  Brambles and the shorter cooldown may lead to additional uses of this cooldown later in the encounter, which may be missed if it's held for too long.
- E.g. if you have a choice between using
Overlapping cooldowns with a direct damage reduction component (![]() Barkskin and
Barkskin and ![]() Survival Instincts) is less ideal than spacing them out because multiple instances of damage reduction reduce the effectiveness of the cooldowns i.e. they are multiplicative with one and other, not additive.
For example, say that without a cooldown a tankbuster would hit you for 1 million damage. With
Survival Instincts) is less ideal than spacing them out because multiple instances of damage reduction reduce the effectiveness of the cooldowns i.e. they are multiplicative with one and other, not additive.
For example, say that without a cooldown a tankbuster would hit you for 1 million damage. With ![]() Barkskin (20% Damage Reduction) you would take 80% of this, so 800k. If you then pressed
Barkskin (20% Damage Reduction) you would take 80% of this, so 800k. If you then pressed ![]() Survival Instincts (50% damage reduction) on top of this, you would reduce your incoming damage (800k after factoring in
Survival Instincts (50% damage reduction) on top of this, you would reduce your incoming damage (800k after factoring in ![]() Barkskin) by 50%. So you would take 400k damage, from a 1 million damage hit, meaning that combined you would mitigate 60% of damage - not 70% (20% + 50%), effectively reducing the effectiveness of the cooldowns compared to their seperate use.
Barkskin) by 50%. So you would take 400k damage, from a 1 million damage hit, meaning that combined you would mitigate 60% of damage - not 70% (20% + 50%), effectively reducing the effectiveness of the cooldowns compared to their seperate use.
Talents
Raid Talents
Below you will find the most optimal builds for DAMAGE in a raid setting, with additional notes mentioning what to change for a more mixed/defensive style build.
Druid of the Claw - Raid Talents
General Playstyle
NOTE
This is a very general idea of how the build wants to play. For a detailed overview of the rotation refer to the Rotation section above
The primary focus of this build is ![]() Ravage, which hits incredibly hard baseline, but has a plethora of modifiers such as Vulnerable Flesh, Bestial Strength, Killing Blow, our Tier set and Apex talent. Whilst we want to spend as much rage as possible on our offensive spenders, we pool our rage as high as possible - only pressing base
Ravage, which hits incredibly hard baseline, but has a plethora of modifiers such as Vulnerable Flesh, Bestial Strength, Killing Blow, our Tier set and Apex talent. Whilst we want to spend as much rage as possible on our offensive spenders, we pool our rage as high as possible - only pressing base ![]() Maul /
Maul / ![]() Raze just before we cap rage, since this maximises our chances of getting a
Raze just before we cap rage, since this maximises our chances of getting a ![]() Ravage proc and also generally keeps us above the Killing Blow threshold. We also have a fairly frequent damage window via Red Moon and a significantly larger window every 2 minutes through
Ravage proc and also generally keeps us above the Killing Blow threshold. We also have a fairly frequent damage window via Red Moon and a significantly larger window every 2 minutes through ![]() Incarnation: Guardian of Ursoc our incredibly powerful Apex talent Wild Guardians's synergy with
Incarnation: Guardian of Ursoc our incredibly powerful Apex talent Wild Guardians's synergy with ![]() Ravage
Ravage
Druid of the Claw Notes
-
For more sustain across an encounter take
 Ursoc's Fury instead of a point in
  Fury of Nature, both of which will be a nice bump to your survivability over an encounter.
 -
For increased self sustain your best option would be to drop Bristling Fur for an incredibly minor damage loss, to pick up Natural Resilience.
-
Another self sustain option that synergises well with Natural Resilience would be to drop
Brambles and put one point into  Reinvigoration - I would only really consider this if you're also running
  Dream of Cenarius however, due to their synergy.
 -
Depending on the encounter, some cleave talents may be preferable to pure single target.
- Taking one of the previously mentioned points and putting it into Raze will help with this.
- Swapping Red Moon to Twin Moonfire may also be an option depending on mob count, how spread the targets are and how long they live for.
- Taking one of the previously mentioned points and putting it into
-
For survivability increases against tankbusters and predictable damage patterns your best options would be:
- Swapping Bristling Fur to
 Reinforced Fur for an additional 10% damage reduction on Barkskin, as well as some more armour to reduce any physical hits further.
 - For particularly hard hitting busters where Barkskin alone is risky and your two charges of Survival Instincts are not enough to cover the entire encounter, swapping Brambles to Ward of the Forest is an option. This talent lets Barkskin provide a significant amount more EHP per use, albeit over a much shorter time frame. It's a very niche talent, but it's incredibly good at fulfilling that niche.
- Swapping Bristling Fur to
-
For our class tree, firstly,
 Circle of the Wild and
  Circle of the Heavens have very deceptive tooltips. You should always be running Circle of the Wild.
- Circle of the Wild actually buffs Guardian (and Feral) abilities - not just all physical
- Circle of the Heavens actually buffs Moonkin and Restoration abilities - not just magical.
- For DotC, this means only Moonfire and Resto healing spells are affected by Heavens, so Wilds makes up a significantly larger portion of our damage.
-
The point in
 Lycara's Inspiration is fairly inconsequential on most encounters. This is particularly useful if an encounter required something like
  Incapacitating Roar/
 Mighty Bash,
  Symbiotic Relationship or
  Innervate.
 Natural Recovery is also a largely irrelevant point, so something to consider if you wanted to keep Lycara's Inspiration but needed both
  Typhoon and
  Ursol's Vortex /
  Mass Entanglement
-
Typhoon is completely swappable with the choice node of Ursol's Vortex and Mass Entanglement so feel free to swap them depending on what an encounter needs. But you should always have at least one of these two paths as a way to path to
 Gift of the Wild
 -
With how weak Ripweaving and Catweaving are compared to The War Within after the
Wildpower Surge nerf, it's really not worth it to ever waste a point on Rip unless you really want to Ripweave for the fun of it. -
Rake however, is basically always taken as it is our only method of pathing to
 Grievous Wounds for the Thrash damage and is also better method of form switching than Shred with Fluid Form
 -
Heart of the Wild is an incredible powerful talent that does still have some flexibility in raids.
- It does incredible high single target damage if used in Cat Form in the form of an empowered
 Feral Frenzy (this will make up the vast majority of your uses in raid)
 - It does strong aoe in Moonkin Form by casting an empowered
 Starfall
 - It does a pretty potent group heal if used in caster form, which may be useful on occasions where your raid is struggling to meet a tough HPS check.
- It does incredible high single target damage if used in
-
 Starfire and Moonkin Form are largely just filler points that can be moved anywhere. The only exception to this is if you're planning to use Moonkin Heart of the Wild at some point.
 -
The
 Soothe /
  Cyclone choice node will always be taken as it is our only option for pathing to the central part of the bottom section of class tree. This nearly always means soothe is chosen.
- Cyclone does occasionally have some niche uses in raid however, usually something to do with preventing a target from gaining a buff but the most recent example was to save players who got mind controlled at the end of phase 1 of Nexus King Saladhar in Manaforge Omega, so do keep it in mind.
-
With both Persistence and
 Wildshape Mastery, the option to use
  Tiger Dash as a way to get from point A to B in a hurry is not only fast but also incredibly safe since we retain our a significant amount of our Bear Form armour and health.
Elune's Chosen - Raid Talents
Much like our other hero talent, this EC build continues to largely work around the power of ![]() Maul /
Maul / ![]() Raze and their modifiers. More so than Dotc though, it can really abuse the power of Red Moon because of the number of arcane damage amps as well as the increased potency and frequency of
Raze and their modifiers. More so than Dotc though, it can really abuse the power of Red Moon because of the number of arcane damage amps as well as the increased potency and frequency of ![]() Lunar Beam, which will line up with the vast majority of casts. It also still has a large burst window every two minutes from Wild Guardians, whilst also lining up
Lunar Beam, which will line up with the vast majority of casts. It also still has a large burst window every two minutes from Wild Guardians, whilst also lining up ![]() Lunar Beam, Red Moon and the
Lunar Beam, Red Moon and the ![]() Mangle resets from
Mangle resets from ![]() Incarnation: Guardian of Ursoc.
Incarnation: Guardian of Ursoc.
Elune's Chosen Notes
-
For more sustain across an encounter take
Ursoc's Fury instead of a point in Fury of Nature, both of which will be a nice bump to your survivability over an encounter.- If dealing with encounters with a good number of targets that are spread around an arena
 Elune's Favored may end up being a better option for trickle healing, simple because Moonfire will continue to contribute even if you're not in melee range of most of the targets.
- If dealing with encounters with a good number of targets that are spread around an arena
-
For increased self sustain your best option would be to drop Bristling Fur for an incredibly minor damage loss, to pick up Natural Resilience.
-
Another self sustain option that synergises well with Natural Resilience would be to drop
Brambles and put one point into Reinvigoration - I would only really consider this if you're also running Dream of Cenarius however, due to their synergy. -
Depending on the encounter, some cleave talents may be preferable to pure single target.
- Taking one of the previously mentioned points and putting it into Raze will help with this.
- Swapping Red Moon to Twin Moonfire may also be an option depending on mob count, how spread the targets are and how long they live for.
- Taking one of the previously mentioned points and putting it into
-
Whilst generally having more available cooldowns than DotC because of the potency of
Lunar Beam, for survivability increases against tankbusters and predictable damage patterns your best options would be:- Swapping Bristling Fur to Reinforced Fur for an additional 10% damage reduction on Barkskin, as well as some more armour to reduce any physical hits further.
- For particularly hard hitting busters where Barkskin alone is risky and your two charges of Survival Instincts are not enough to cover the entire encounter, swapping Brambles to Ward of the Forest is an option. This talent lets Barkskin provide a significant amount more EHP per use, albeit over a much shorter time frame. It's a very niche talent, but it's incredibly good at fulfilling that niche.
- Swapping Bristling Fur to
-
Whilst very uncommon, swapping
 Moondust for
  Elune's Grace is a potentially useful swap. This will mainly be a benefit on fights with frequent knockbacks to allow you to potentially prevent more of them or potentially on encoutners with lots of frequent movement between groups of adds.
 -
For our class tree, firstly,
Circle of the Wild and Circle of the Heavens have very deceptive tooltips. You should always be running Circle of the Wild.- Circle of the Wild actually buffs Guardian (and Feral) abilities - not just all physical
- Circle of the Heavens actually buffs Moonkin and Restoration abilities - not just magical.
- For EC, this means only Moonfire,
 Starsurge and Resto healing spells are affected by Heavens, so Wilds still makes up a larger portion of our damage.
-
The point in
Lycara's Inspiration is fairly inconsequential on most encounters. This is particularly useful if an encounter required something like Incapacitating Roar/Mighty Bash, Symbiotic Relationship or Innervate.- Natural Recovery is also a largely irrelevant point, so something to consider if you wanted to keep Lycara's Inspiration but needed both Typhoon and Ursol's Vortex / Mass Entanglement
-
Typhoon is completely swappable with the choice node of Ursol's Vortex and Mass Entanglement so feel free to swap them depending on what an encounter needs. But you should always have at least one of these two paths as a way to path to Gift of the Wild
-
With how weak Ripweaving and Catweaving are compared to The War Within after the
Wildpower Surge nerf, it's really not worth it to ever waste a point on Rip unless you really want to Ripweave for the fun of it. -
Rake however, is basically always taken as it is our only method of pathing to Grievous Wounds for the Thrash damage and is also better method of form switching than Shred with Fluid Form
-
Heart of the Wild is an incredible powerful talent that does still have some flexibility in raids.
- It does incredible high single target damage if used in Cat Form in the form of an empowered Feral Frenzy (this will make up the vast majority of your uses in raid)
- It does strong aoe in Moonkin Form by casting an empowered Starfall
- It does a pretty potent group heal if used in caster form, which may be useful on occasions where your raid is struggling to meet a tough HPS check.
- It does incredible high single target damage if used in
-
Starfire and Moonkin Form are largely just filler points that can be moved anywhere. The only exception to this is if you're planning to use Moonkin Heart of the Wild at some point.
-
The
Soothe / Cyclone choice node will always be taken as it is our only option for pathing to the central part of the bottom section of class tree. This nearly always means soothe is chosen.- Cyclone does occasionally have some niche uses in raid however, usually something to do with preventing a target from gaining a buff but the most recent example was to save players who got mind controlled at the end of phase 1 of Nexus King Saladhar in Manaforge Omega, so do keep it in mind.
-
Now with Persistence in the class tree, the option to use
Tiger Dash as a way to get from point A to B in a hurry is not only fast but also incredibly safe since we retain our a significant amount of our Bear Form armour and health.
Mythic+ Talents
I strongly encourage you to experiment with talents and find something you enjoy and succeed with. That said, below are some potential ideas for builds you could use as a starting point, or to just run as-is, for both of Guardian's hero trees. I've tried to show some of the variation available due to talent swaps that would allow you to tailor your talent build to suit different scenarios, for more extensive information on these swaps please see the customisations section for each of the hero tree's below their respective example builds.
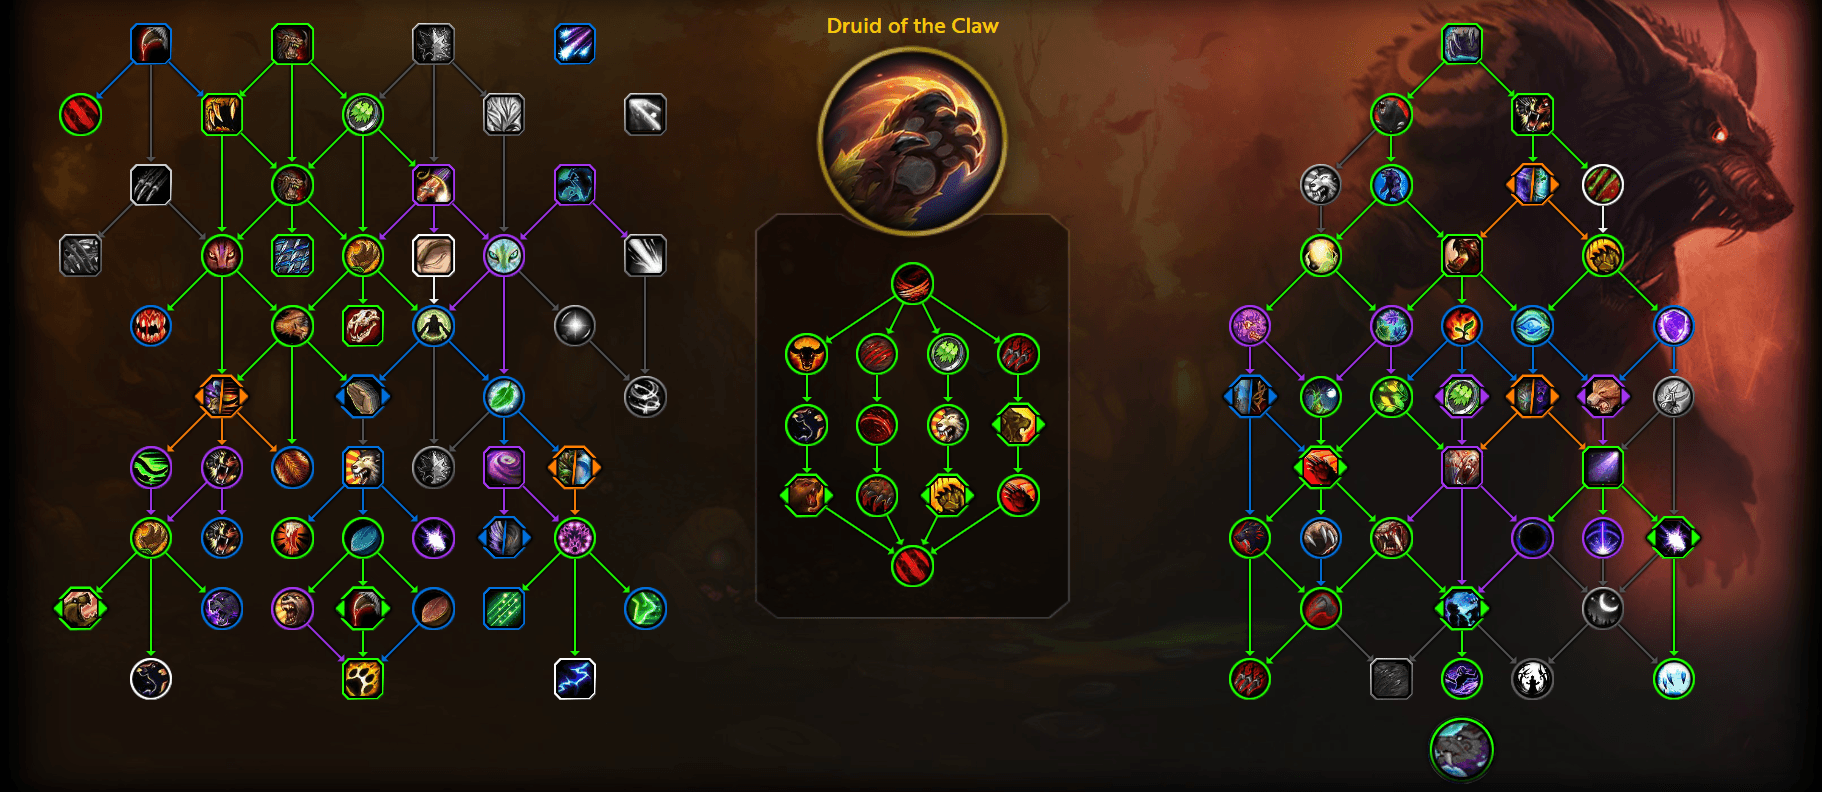
Druid of the Claw - Mythic+ Talents
This image gives a rough idea of the relative power of a talent node based on its assigned colour, I strongly encourage you to take this information below and use it to either adjust the trees above to you/your groups needs and wants or to come up with your own from scratch. The key for what each colour represents is:
- Green - These are your staples. Every DotC mythic+ build should aim to always have these talents.
- Purple - Strong talents in their own right that will fit into most builds.
- Blue - Talents that are a bit weak either due to their position, cost or power relative to nearby nodes. However, these nodes are usually needed to flesh out a sections point total or for pathing to access stronger talents further down the tree.
- Orange - This shows where both of the talents in a choice node are a competitive choice. The reasoning behind which of these choices to talent will be discussed below the image.
- White - These are niche options that on their own are a bit weak with specific complimentary talents can be very powerful options to take. The reasonings on when to talent these can be found below the image
- Grey - Not worth considering currently.
In the class tree there's a few talents to move around that offer some customisation. Here are some of the main ones to consider:
- Fluid Form is primarily taken to make utilising Heart of the Wild a bit less clunky and without losing two globals to form switching.
- This is also why Moonkin Form is taken. If you've planned out your pulls and know you don't intend to use Moonkin Heart of the Wild then the points in Moonkin Form and Starfire can be reallocated elsewhere.
- Rake also falls into this category but it is also our only way of pathing to Grievous Wounds so is largely worth taking whether you intend to use Fluid Form or not.
 Hibernate is situational because not only do you need a beast mob present in dungeons, it's also a fairly awkward ability to use - even though you don't drop form it does still have a cast time, during which you cannot dodge - so it is usually best to find an alterantive method for cc in the group if possible.
- Innervate, most of the time in m+ this won't be needed given the healers ability to constantly top up their mana. There may be times where a healer requests it for a particularly rough boss in high keys but it does mean giving up some relatively lower value talent in the bottom third, like Lycara's Inspiration, Fluid Form,
 Improved Stampeding Roar or the Improvement nodes for Typhoon or
  Well-Honed Instincts if chosen.
  Remove Corruption would be a niche pick if it werent our best method to access the entire right side of the tree. As such, this should be taken nearly all of the time despite being entirely useless in some dungeons. The exception, is if you chose to path through Moonkin Form to use with Heart of the Wild as this will also grant access to
  Nurturing Instinct meaning you can spend the dispel point elsewhere. You'll obviously still want it if the dungeon has a dispel though.
- It's a similar story with regards to Soothe to access the likes of
 Stampeding Roar and Lycara's, meaning that Soothe should be taken all of the time, whether it has a use in a dungeon or not. Even in the rare circumstance where Cyclone does have some use, the difficulty in using it whilst playing as the tank makes its incredibly hard to even try and justify.
 - Tiger Dash has some potential as a personal burst movement cooldown. Particularly useful if you need to kite and are already being slowed since it will automatically shift you into Cat Form (removing the slow/root) and give you the massive movement speed buff to create distance immediately without putting you in danger due to the bonuses from Wildshape Mastery and Persistence.
- Also because of Persistence,
 Wild Charge can now offer a similar burst movement ability by utilising a cancel form Wild Charge macro to caster form charge to an ally in a safe location. This does have the downside of lacking control, as it requires an ally to be in a good position, but it comes with the upside that Wild Charge is much more versatile than Tiger Dash and can be used to help with pulling mobs, cancel knockbacks and, in some rarer cases, provide ways to pull or skip packs that wouldn't usually be possible.
  Lingering Healing has some potential synergy with Reinvigoration since it extends both the empowered
  Regrowth and
  Rejuvenation that you gain as a result.
 Forestwalk can work similarly, since it will provide the healing increase and movement speed to yourself thanks to the Regrowth from Reinvigoration
- Symbiotic Relationship is unfortunately a bit weak for us, as not all of our healing is actually contributed to your ally. You can force it to kind of work by using as many offhealing abilities as possible but unfortunately, even at it's best it falls a bit flat.
 Incessant Tempest may have an occasional use case if a knockback is required every 25-30 seconds, but this scenario is incredibly unlikely so there's usually better options for the talent point.
  Gale Winds does have more potential use given it can make moving mobs together a little bit easier with the increased distance but this is ultimately a very, very small upgrade to base typhoon and usually neither upgrade is worth the point but the option is there!
The Druid of the Claw Hero Tree itself only really posseses two real choices.
- With the changes coming in to midnight, including a significant nerf to Wildpower Surge and a serious buff to Bear Form abilities (paricularly Mangle and Maul), Empowered Shapeshifting is currently just a clear winner in all scenarios offensively and it also comes with a fairly powerful heal effect tied to Mangle, which you can expect to cast more of in large part due to Harnessed Rage
- The other choice is between
 Ruthless Aggression and
  Killing Strikes. Currently Killing Strikes is just better in all scenarios, even with chain pulls and constant combat to never take advantage of it's secondary effect providing a Ravage on entering combat.
The Spec tree also comes with some different options to consider:
 After the Wildfire is a bit of a shell of its former self. It will still help out your healer on rot encounters or throughput checks but the amount of healing it does to an average DPS/Healer's healthbar is relatively low and has been for a while. This largely nullifies the previous opportunity for skill expression by timing a proc to maximise it's value and you're generally better off just ignoring it and treating it as a free passive to not think too hard about.
- Reinvigoration is a decently powerful talent with multiple synergies with across our class and spec tree, the most notable of which is with Dream of Cenarius resulting in a massive initial heal whenever
 Frenzied Regeneration is used. Ordinarily, this would cause massive amounts of overhealing but with the introduction of Natural Resilience, these three talents and the additional amp from
  Innate Resolve turn Frenzied Regeneration into a self-sustain powerhouse of ajn ability.
 - Dream Guide currently is a bit weak and not usually worth taking. However, in 12.0.5 it is getting a change that causes it to auto-cast empowered Regrowths instead of base level Regrowths. This has some serious group healing potential since it will automatically cast on you and your allies whenever they need it most. When that patch hits, this choice node will effectively turn into a question of increased self-sustain (!Dream of Cenarius via the synergies mentioned above) or frequent, clutch and automatic group heals.
- You could be excused for completely forgetting
 Infected Wounds exists, but if neither Dream of Cenarius nor Dream Guide take your fancy, or you're in a position where you know you're going to have to kite a significant number of packs through a run then a 50% slow on all mobs (bar elites) with up to 100% uptime via Raze is a node that has some potential use case.
 - Killing Blow is an incredibly strong talent that massively increases the power and rage efficiency of casting Maul / Raze so long as you're able to cast it above 60 rage. Something that, with our abundance of rage enhancing talents, is incredibly easy, even on single target. For DotC this is an absolute must-have.
- Ursoc's Fury, despite repeated nerfs since its inception, will provide a very solid amount of absorbs. This is largely due to the power of Ravage along with the increased usability of Raze in Midnight. This also has some nice synergy with our Apex and Tier bonus since the additional Ravage procs will also contribute to the absorb.
- Galactic Guardian and
 Twin Moons are still incredible talents even in the largely physical focused DotC tree, just like in Dragonflight they will provide a good 15-20% of your rage generation in AoE without you even pressing Moonfire at all.
 - Red Moon unfortunately, is largely not worth using in Dungeons. It's an incredibly potent 30 second CD that will do a huge amount of damage and a solid amount of rage on single or low target counts, however, this comes at the fairly significant cost of the utility Moonfire offers. Being able to pull targets from range; be it to pull multiple packs, pick up adds that have spawned far away or to immediately pull and LoS dangerous caster's to group them, is an incredibly underappreciated ability until you try and do a run without it!
- On the topic of Rage generation,
 Blood Frenzy still contributes around 30+% of your total rage gen across a dungeon, this talent is absurdly powerful and will be a significant factor in how many Ironfur stacks and Raze's you're able to use throughout a dungeon.
 - Another way to artificially increase rage throughout a dungeon is to look at
 Ursoc's Endurance and Guardian of Elune both of which add 2-3 seconds to your Ironfur duration which, when combined, will nearly double duration of each stack. Ultimately this means you can spend less rage on Ironfur and move more of that rage spending into Raze (or just maintain higher Ironfur stacks if things are really hitting you hard).
 - On the choice node with Guardian of Elune is Gift of an Ancient Guardian which, whilst boring, is a decent chunk of mastery for doing something that you'd do throughout the dungeon anyway - maintaining at least one stack of Ironfur
- Lunar Beam for Druid of the Claw is less of a defensive and more of an offensive modifier. Syncing it with your periods of higher damage (especially Incarn and Heart of the Wild) is generally your best use case but it can still be used to suppliment Barkskin or Survival Instincts should a bit more EHP be required for a mechanic.
 Survival of the Fittest is a strong talent that massively increases our flexibility on defensives on an encounter and our uptime on two of our key defensives (Barkskin and Survival Instincts). If it's not needed to cover every buster on an encounter then its value is definitely diminished. It will still provide more uses but pathing through After the Wildfire to get Reinfroced Fur might be a preferred option. Essentially a question of if you would prefer more frequent Barks or more potent Barks.
- On the topic of more potent Barkskin, Ward of the Forest adds a significant amount of EHP to Barkskin but comes at a pretty steep cost with a 40% cut to duration. There may be a world where this is an option that's considered in push keys to live a particularly threatening tank buster where baseline Barkskin, albeit unlikely given just how significant a decrease in uptime this would be across the whole dungeon.
- Also worth noting that later in the tier, with high level gear we will likely be sitting at the armour cap of 85% phsyical reduction a lot in aoe and even ST pulls, the combination of Killing Strikes' agility gain (which increases Ironfur armour), Killing Strikes' 20% more armour from Ironfur, Reinforced Fur will make maintaining the 85% armour cap fairly trivial with good rage generation and an additional 10% DR on Barkskin is nothing to sniff at.
 Moonless Night is a very one dimensional talent, if you're looking to do a lot of damage then it's one to consider but bare in mind that a large portion of this damage will come from the fact that every moonfired target hit by Raze and Ravage will trigger Moonless Night's effect even though they're technically AOE spells.
- Sundering Roar and Waking the Nightmare are both brand new talents to Midnight but unfortunately are just too undertuned to compete currently.
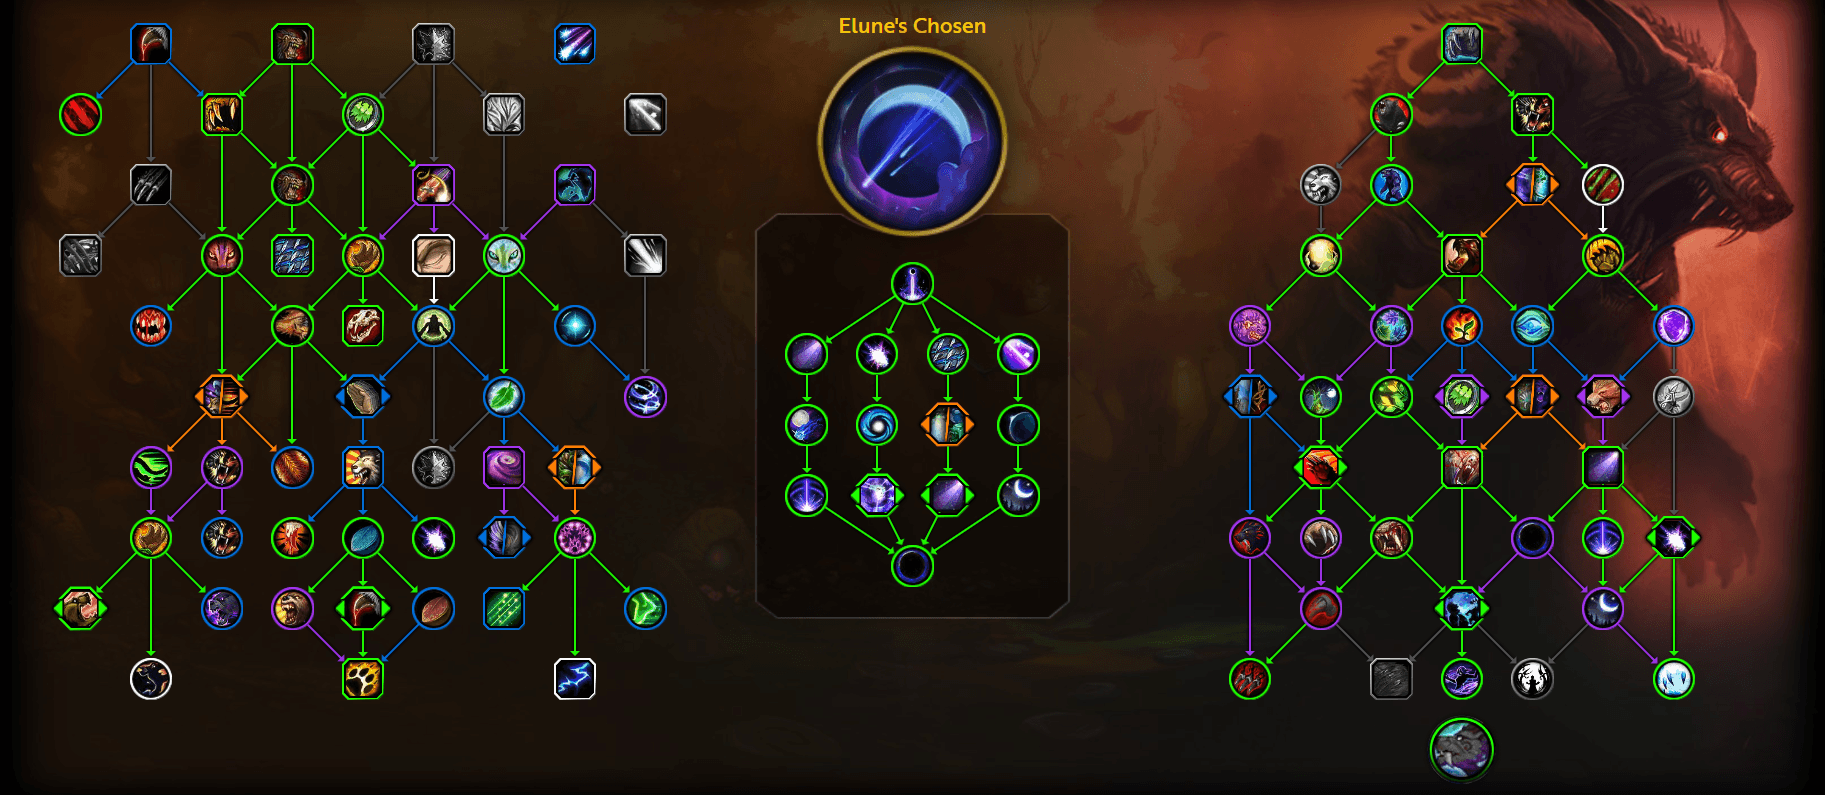
Elune's Chosen - Mythic+ Talents
This image gives a rough idea of the relative power of a talent node based on its assigned colour, I strongly encourage you to take this information below and use it to either adjust the trees above to you/your groups needs and wants or to come up with your own from scratch. The key for what each colour represents is:
- Green - These are your staples. Every DotC mythic+ build should aim to always have these talents.
- Purple - Strong talents in their own right that will fit into most builds.
- Blue - Talents that are a bit weak either due to their position, cost or power relative to nearby nodes. However, these nodes are usually needed to flesh out a sections point total or for pathing to access stronger talents further down the tree.
- Orange - This shows where both of the talents in a choice node are a competitive choice. The reasoning behind which of these choices to talent will be discussed below the image.
- White - These are niche options that on their own are a bit weak with specific complimentary talents can be very powerful options to take. The reasonings on when to talent these can be found below the image
- Grey - Not worth considering currently.
The Druid class tree offers a little more in the way of customisation for EC compared to DotC, largely due to the points saved from not having weaving be a part of the rotation. Below are some of the notable options to consider:
- I will immediately clarify that Circle of the Wild should always be taken over Circle of the Heavens. This is because of an inaccurate tooltip description for how the talent works. Wilds buffs all Guardian and Feral spells, including Lunar Beam and
 Lunar Calling Thrash. Heavens will buff all Balance and Restoration spells, the only significant one of which would be Moonfire but this is not enough to make Heavens better than Wilds in any scenario.
In the class tree there's a few talents to move around that offer some customisation. Here are some of the main ones to consider:
Lunar Calling Thrash. Heavens will buff all Balance and Restoration spells, the only significant one of which would be Moonfire but this is not enough to make Heavens better than Wilds in any scenario.
In the class tree there's a few talents to move around that offer some customisation. Here are some of the main ones to consider: - Fluid Form is primarily taken to make utilising Heart of the Wild a bit less clunky and without losing two globals to form switching.
- This is also why Moonkin Form is taken. If you've planned out your pulls and know you don't intend to use Moonkin Heart of the Wild then the points in Moonkin Form and Starfire can be reallocated elsewhere.
- Rake also falls into this category but it is also our only way of pathing to Grievous Wounds so is largely worth taking whether you intend to use Fluid Form or not.
- Hibernate is situational because not only do you need a beast mob present in dungeons, it's also a fairly awkward ability to use - even though you don't drop form it does still have a cast time, during which you cannot dodge - so it is usually best to find an alterantive method for cc in the group if possible.
- Innervate, most of the time in m+ this won't be needed given the healers ability to constantly top up their mana. There may be times where a healer requests it for a particularly rough boss in high keys but it does mean giving up some relatively lower value talent in the bottom third, like Lycara's Inspiration, Fluid Form, Improved Stampeding Roar or the Improvement nodes for Typhoon or Well-Honed Instincts if chosen.
- Remove Corruption would be a niche pick if it werent our best method to access the entire right side of the tree. As such, this should be taken all the time despite being entirely useless in some dungeons.
- It's a similar story with regards to Soothe to access the likes of Stampeding Roar and Lycara's, meaning that Soothe should be taken all of the time, whether it has a use in a dungeon or not. Even in the rare circumstance where Cyclone does have some use, the difficulty in using it whilst playing as the tank makes its incredibly hard to even try and justify.
- Tiger Dash has some potential as a personal burst movement cooldown. Particularly useful if you need to kite and are already being slowed since it will automatically shift you into Cat Form (removing the slow/root) and give you the massive movement speed buff to create distance immediately without putting you in danger due to the effect from Persistence.
- Also because of Persistence, Wild Charge can now offer a similar burst movement ability by utilising a cancel form Wild Charge macro to caster form charge to an ally in a safe location. This does have the downside of lacking control, as it requires an ally to be in a good position, but it comes with the upside that Wild Charge is much more versatile than Tiger Dash and can be used to help with pulling mobs, cancel knockbacks and, in some rarer cases, provide ways to pull or skip packs that wouldn't usually be possible.
- Lingering Healing has some potential synergy with Reinvigoration since it extends both the empowered Regrowth and Rejuvenation that you gain as a result.
- Forestwalk can work similarly, since it will provide the healing increase and movement speed to yourself thanks to the Regrowth from Reinvigoration
- Symbiotic Relationship is unfortunately a bit weak for us, as not all of our healing is actually contributed to your ally. You can force it to kind of work by using as many offhealing abilities as possible but unfortunately, even at it's best it falls a bit flat.
- Incessant Tempest may have an occasional use case if a knockback is required every 25-30 seconds, but this scenario is incredibly unlikely so there's usually better options for the talent point. Gale Winds does have more potential use given it can make moving mobs together a little bit easier with the increased distance but this is ultimately a very, very small upgrade to base typhoon and usually neither upgrade is worth the point but the option is there!
 Starlight Conduit is a minor damage increase for EC due to Star Cascade, so becomes a minor bonus talent to consider if you do find yourself with points to spare in the mid section.
In the Hero Tree there is really no choice at all for keys.
- Due to the Bear aura not affected non guardian spells and frankly very low tuning of Lunar Beam, Stellar Command offers no perceivable benefit whilst Lunar Calling does increase thrash damage by all of our arcane modifiers and also increases kit synergy with Lunation.
- The Light of Elune offers a decent chunk of rage at fairly regular intervals and Astral Insight is unfortunately tuned too low to make a massive impact.
- Moondust is effectively a permanent slow on any cc'able mob in the dungeon due to our automatic moonfire spreading which is significantly more impactful than a 3s shorter cooldown on wild charge. Occasionally you may get some use from the reduced charge cooldown to cancel frequent knockbacks on a fight but this would be incredible niche, and we can still cancel knockbacks via
 Skull Bash in exactly the same way as Wild Charge
 - Lastly, Lunation drastically increases our uptime on the focal point ability of the hero tree (Lunar Beam) whilst Arcane Affinity offers an almost inperceivable buff to our Arcane damage.
The Spec tree also comes with some different options to consider:
- After the Wildfire is a bit of a shell of its former self. It will still help out your healer on rot encounters or throughput checks but the amount of healing it does to an average DPS/Healer's healthbar is relatively low and has been for a while. This largely nullifies the previous opportunity for skill expression by timing a proc to maximise it's value and you're generally better off just ignoring it and treating it as a free passive to not think too hard about.
- Reinvigoration is a decently powerful talent with multiple synergies with across our class and spec tree, the most notable of which is with Dream of Cenarius resulting in a massive initial heal whenever Frenzied Regeneration is used. Ordinarily, this would cause massive amounts of overhealing but with the introduction of Natural Resilience, these three talents and the additional amp from Innate Resolve turn Frenzied Regeneration into a self-sustain powerhouse of ajn ability.
- Dream Guide currently is a bit weak and not usually worth taking. However, in 12.0.5 it is getting a change that causes it to auto-cast empowered Regrowths instead of base level Regrowths. This has some serious group healing potential since it will automatically cast on you and your allies whenever they need it most. When that patch hits, this choice node will effectively turn into a question of increased self-sustain (!Dream of Cenarius via the synergies mentioned above) or frequent, clutch and automatic group heals.
- Killing Blow is an incredibly strong talent that massively increases the power and rage efficiency of casting Maul / Raze so long as you're able to cast it above 60 rage. Something that, with our abundance of rage enhancing talents, is incredibly easy, even on single target.
- Ursoc's Fury, despite repeated nerfs since its inception, will provide a very solid amount of absorbs. So long as Raze is getting some use throughout the dungeon. However, for EC, Elunes Favored becomes a much more competitive option due to the amount of damage it does that is Arcane.
- Galactic Guardian and Twin Moons are far too good of a combination for EC, just like in Dragonflight they will provide a good 15-20% of your rage generation in AoE without you even pressing Moonfire at all.
- Red Moon unfortunately, is largely not worth using in Dungeons. It's an incredibly potent 30 second CD that will do a huge amount of damage and a solid amount of rage on single or low target counts, however, this comes at the fairly significant cost of the utility Moonfire offers. Being able to pull targets from range; be it to pull multiple packs, pick up adds that have spawned far away or to immediately pull and LoS dangerous caster's to group them, is an incredibly underappreciated ability until you try and do a run without it!
- On the topic of Rage generation, Blood Frenzy still contributes around 30+% of your total rage gen across a dungeon, this talent is absurdly powerful and will be a significant factor in how many Ironfur stacks and Raze's you're able to use throughout a dungeon.
- Another way to artificially increase rage throughout a dungeon is to look at Ursoc's Endurance and Guardian of Elune both of which add 2-3 seconds to your Ironfur duration which, when combined, will nearly double duration of each stack. Ultimately this means you can spend less rage on Ironfur and move more of that rage spending into Raze (or just maintain higher Ironfur stacks if things are really hitting you hard).
- On the choice node with Guardian of Elune is Gift of an Ancient Guardian which, whilst boring, is a decent chunk of mastery for doing something that you'd do throughout the dungeon anyway - maintaining at least one stack of Ironfur
- Lunar Beam for EC is an incredibly versatile focal ability, effectively turning it into a Barkskin equivalent defensively whilst massively increasing your healing and damage through it's mastery bonus. Syncing it with your periods of higher damage (especially Incarn and Heart of the Wild) is very potent it can also be used as an additional defensive cooldown or to suppliment Barkskin or Survival Instincts should more EHP be required for a mechanic.
- Survival of the Fittest is a strong talent that massively increases our flexibility on defensives on an encounter and our uptime on two of our key defensives (Barkskin and Survival Instincts). If it's not needed to cover every buster on an encounter then its value is definitely diminished. It will still provide more uses but pathing through After the Wildfire to get Reinfroced Fur might be a preferred option. Essentially a question of if you would prefer more frequent Barks or more potent Barks.
- On the topic of more potent Barkskin, Ward of the Forest adds a significant amount of EHP to Barkskin but comes at a pretty steep cost with a 40% cut to duration. There may be a world where this is an option that's considered in push keys to live a particularly threatening tank buster where baseline Barkskin, albeit unlikely given just how significant a decrease in uptime this would be across the whole dungeon.
- Moonless Night is a very one dimensional talent, if you're looking to do a lot of damage then it's one to consider but bare in mind that a large portion of this damage will come from the fact that every moonfired target hit by Raze will trigger Moonless Night's effect even though they're technically AOE spells.
- Sundering Roar and Waking the Nightmare are both brand new talents to Midnight but unfortunately are just too undertuned to compete currently.
 Flashing Claws has a strong synergy with EC due to the effects of Lunar Calling maybe it a key ability with multiple synergies that it otherwise wouldn't possess. It can be difficult to find the points neccesary to take it, but in lower/weekly keys especially it's an option to consider playing around with.
Consumables
Flasks
-
 Flask of the Blood Knights - Static haste flask. This will be your default flask for Guardian.
 -
In rare cases where your gear already provides a significant amount of haste, one of Flask of Thalassian Resistance,
 Flask of the Magisters or
  Flask of the Shatter Sun may actually end up better. You can sim yourself to be certain but this is very unlikely to happen in season 1.
Food
-
Hearty versions of all food continue to exist in Midnight. These are generally preferred since these versions will allow the buff to persist through death.
-
Silvermoon Parade OR
 Harandar Celebration - Both of these feasts are functionally identical, providing 50 Agility and 98 Stamina. Your default best food option for season 1.
 -
Royal Roast OR Impossibly Royal Roast - Your best personal food options. Both of these are functionally identical and will provide 50 Agility.
Potions
-
Light's Potential - Your default potion for all Midnight season 1 content. Very straightforward, gives a lot of main stat that lasts 30 seconds.
-
Potion of Zealotry - A niche potion that may have use on purely single target fights. Deals increasing damage to a target the longer you're hitting it but damaging another target will reset the buff. If another target exists it's likely not worth risking, since a stray
Thrash cleave or a Galactic Guardian Moonfire may reset it's progress. -
 Silvermoon Health Potion The new standard healing potion for 12.0. You should always have some of these on you if you're planning to do any challenging content.
 -
Void-Shrouded Tincture The invisibility potion for Midnight, fairly niche given our access to
 Prowl but, on occasion, invisiability does enable pathing in dungeons that stealth does not.
Oils/Stones
You have two options here depending on expected target counts.
-
Smugglers Enchanted Edge - Loses power as tasrget counts increase but should give a slight edge on very low target counts.
-
Thalassian Phoenix Oil - Generally better as target counts start to increase. This will be your default choice if you just want one oil for everything.
Runes
 Void-Touched Augment Rune - Currently your only option for an augment rune with no reusuable alternative. Provides 25 Agility which is also lost on death.
Gearing
Stat Priority
Offensive
WARNING
Sim yourself using Radibots Top Gear to decide on what to use out of items you have. Use Droptimizer to identify potential damage upgrades you can get from content. Do not follow a set stat priority for damage
Defensive
WARNING
The defensive difference between secondary stats on the whole is incredibly minor. In terms of a rough value, generally less than a % gain in survivability by focusing on one secondary stat over another. The defensive gain from equipping a higher item level piece of equipment will (with the exception of trinkets/cantrip effects) always be better for survivability than choosing a lower item level piece with specific secondary stats.
Agility >>>> Mastery > Vers > Haste/Crit
Tertiary Stats
Tertiary stats are - as the name implies - a tertiary consideration. They are not a significant enough factor to Tank survivability to influence your gearing on their own outside of very specific circumstance.
Embellishments
Two options here, depending on if you want to prio early season power (which can then transition later in the season) or focus purely on the crafting endgame.
If you want the earliest power spike possible, use your sparks to craft one of our three weapon options with Mythic crests - Blood Knight's Mercy, ![]() Blood Knight's Impetus or
Blood Knight's Impetus or ![]() Aln'hara Pikestaff. You'll also be able to use veterans crests to craft two non-spark items with a low-stat budget slots (wrists, cloak, boots) with the
Aln'hara Pikestaff. You'll also be able to use veterans crests to craft two non-spark items with a low-stat budget slots (wrists, cloak, boots) with the ![]() Arcanoweave Lining embellishment. You can then use future sparks to upgrade these embellishment slots as the season progresses.
Arcanoweave Lining embellishment. You can then use future sparks to upgrade these embellishment slots as the season progresses.
If you were lucky enough to get a very early weapon or simply don't want to have to ever recraft your gear then simply craft 2 low budget slots (wrists and cloak preferred but waist and boots are also fine) with the ![]() Arcanoweave Lining embellishment
Arcanoweave Lining embellishment
Enchantments
| Slot | Enchant | Notes |
|---|---|---|
| Weapon | A Standard agility proc weapon enchant. May get displaced by one of the other options later in the expansion but strong in all scenarios for now. | |
| Helm | Empowered Blessing of Speed or | Personal preference. All three of Speed, Leech and Avoidance have some minor benefit for you. |
| Shoulders | Akil'zon's Swiftness or | Personal preference. All three of Speed, Leech and Avoidance have some minor benefit for you. |
| Chest | Grants some extra Agility. Can use Mark of the Rootwarden for move speed at the cost of some Agility. | |
| Legs | Main stat plus stamina or armor. Minimal difference - armor slightly better vs physical, stamina vs magic. | |
| Boots | Farstrider's March or | Personal preference. All three of Speed, Leech and Avoidance have some minor benefit for you. |
| Ring | Secondary stat variants: Critical Strike, Haste, Mastery, Versatility | Sim for optimal DPS combination, these enchants and gems are a good way of really min maxing your secondary distribution. Haste is a safe default choice if that doesn't interest you. |
Gems
Eversong Diamond
This is your meta gem for the expansion, you can only one of these socketed in your gear at a time.
![]() Indecipherable Eversong Diamond - Your best choice for the expansion, with a roughly 40% increased stat budget to the other options it is your best option for throughput.
Indecipherable Eversong Diamond - Your best choice for the expansion, with a roughly 40% increased stat budget to the other options it is your best option for throughput.
Standard Gems
Your standard gems for Midnight come in various combinations of Critical Strike (Garnet), Haste (Peridot), Versatility (Lapis) and Mastery (Amethyst). you can equip as many of these types of gems as you want so long as you have the socket slots to hold them. The pure statted versions of these gems are generally to be avoided as you'll get more value from the greater total stats of the combination gems.
Standard gems are great for some minor evening-out of stats and your best combination will change frequently as your gear changes. The best way to find your best available combination of gems is to sim yourself using Raidbots.
Trinkets and Cantrip Items
Trinkets
Damage Trinkets
Typically Guardian will favour one on use trinket, which is paired with ![]() Incarnation: Guardian of Ursoc and one passive trinket, but for damage, please sim yourself on Raidbots to be sure. Some key stand outs for both of these types of trinket are:
Incarnation: Guardian of Ursoc and one passive trinket, but for damage, please sim yourself on Raidbots to be sure. Some key stand outs for both of these types of trinket are:
-
 Gaze of the Alnseer - Passive trinket with a main stat proc that can provide an incredibly high amount of stats. Even after the nerfs it's looking very solid for Guardian.
 -
 Algeth'ar Puzzle Box - An absolute powerhouse of an on-use trinket. Albeit, a bit annoying to use. Provides an incredibly high amount of Mastery on use after a short channel. Your best use case for this is using it immediately before an Incarnation: Guardian of Ursoc pull to really put those stats to use. Also, comes from Algeth'ar Academy so is completely farmable.
 -
 Light Company Guidon - Similar use case to Puzzlebox, the 90 second cd can, and should, be paired with Incarn to really empower the Incarn window. Does however give less stats and for a shorter duration in return for not being as tedious to use.
 -
 Emberwing Feather - Effectively a mythic plus version of Guidon but with a 2 minute cooldown and a small chance of reducing one of your stats by a small amount. This negative effect is basically just flavour text and isn't something to worry about if you do get this trinket.
 -
Umbral Plume - A two sided trinket that can be used out of combat to flip between a Mastery and Crit stat stick - we want the Crit side. The amount of stats it provides slowly declines over 60 seconds before starting the cycle again at max value. A strong passive option, especially since it regenerates out of combat allowing you to open a pull in
Incarnation: Guardian of Ursoc and get highest value - especially if you repeat this every two minutes.
Defensive Trinkets
-
Gloom Spattered Dreadscale - An on use absorb trinket, with static crit. Deals a small amount of damage and grants a partial absorb based on the damage done. Whilst the most powerful at low target counts, the increased scaling on the damage per additional enemy hit make it a solid choice as an extra defensive in aoe encounters.
-
Solar Core Igniter - Another on use absorb trinket, this one with static primary stat. The absorb doesn't scale in size like Dreadscale nor does it do damage itself, but by having primary stat it will naturally cause all of your abilities to deal a little more damage. However, it does have a short 90 seconds cooldown and also grants a small amount of scaling vers should the absorb last the full duration - it's also farmable from Mythic plus!
-
The Eternal Egg - Passive option with static main stat that grants you some smaller partial absorbs. This trinket does have the advantage of granting some additional haste if the absorb lasts its duration, but I wouldnt expect this to happen frequently whilst something is actually hitting you.
Cantrip Items
-
Eye of Midnight - Single statted haste ring. The bonus effect is pretty minor but the fact the ring comes with a full stat budgets worth of our favoured secondary stat makes this a big chase item for Guardian.
-
Eternal Voidsong Chain - Nicely statted neck which comes with a free bonus damage proc. Because Guardian doesn't have any shadow damage in it's kit, you will need to replace one of your embellishments with Devouring Banding but with how similar embellishments are, this will likely end up worth doing.
-
Omission of Light and Occulsion of Void - a set of rings from Nexus-Point Xenas. Based on stats alone, these aren't your strongest choice and, unfortunately, the set effect was woefully undertuned during beta. If you get these, it will likely be worth holding on to in case the effect is buffed but currently there doesnt seem to be enough of a reason to pick these over another pair of rings.
Miscellaneous
Macros
BoP Cancelaura macro
A situationally useful macro for tanks primarily. BoP (Blessing of Protection) is a paladin external that will remove many harmful debuffs from its target, the downside is that it renders the target immune to physical damage so mobs will target someone else since they cannot hit you as the tank while Bop’d.
This macro will remove the Blessing of Protection buff from yourself, meaning that mobs will continue to target you rather than your allies but you will still have the applicable debuffs removed by the BoP application.
/cancelaura Blessing of Protection
Set Mouseover as Focus macro
A macro that is more useful in some content than other (Keys and pvp primarily) but still a useful tool to use is the focus targets. To set a mouseover target as your Focus target simply mouseover over the mob and press this macro:
/focus [@mouseover,exists,nodead]
Note: To select a different mob as your focus you can simply mouseover the new mob and press the macro again. To completely remove any mob as your focus you can simply mouseover nothing and press the macro once more.
Mouseover Combat Res macros
An essential macro for all druid specs. This macro will attempt to cast Rebirth at your current mouseover target so long as they are a friendly character and are dead.
#showtooltip
/cast [@mouseover,help,dead] Rebirth
Many players prefer to use a more advanced version of this macro which will cast either Rebirth or Revive based on whether the player is in combat or not. This is entirely personal preference but the macro would look something like:
#showtooltip
/cast [@mouseover,combat,help,dead] Rebirth;
/cast [@mouseover,nocombat,help,dead][] Revive
One Key Shapeshift/Fluid Form macros
Some people prefer to have a single keybind that will allow them to shift between ![]() Bear Form and
Bear Form and ![]() Cat Form rather than binding both forms seperately, which is typically done by a macro.
Cat Form rather than binding both forms seperately, which is typically done by a macro.
This macro will:
- Check if you are not in Bear Form, and if so will attempt to switch you to Bear Form
- If you are already in Bear Form, it will attempt to switch you to Cat Form
#showtooltip
/cast [noform:1] bear form
/cast [form:1] cat form
With the addition of ![]() Fluid Form a variant of this macro has become fairly popular for use during combat that allows lets you press Rake (or Shred) in Bear Form and Mangle in Cat Form using a single key bind.
Fluid Form a variant of this macro has become fairly popular for use during combat that allows lets you press Rake (or Shred) in Bear Form and Mangle in Cat Form using a single key bind.
This macro will:
- Check if you are not in Bear Form, and if so will attempt to cast Mangle
- If you are already in Bear Form, it will attempt to cast Rake
NOTE
If the macro is not shifting you when you press it then check that:
- You have Fluid Form talented
- You are in range of the target to cast Rake/Shred/Mangle
- Mangle is not on cooldown
#showtooltip
/cast [noform:1] Mangle
/cast [form:1] Rake
Bear Form Required Ability macros
Several spells require you to be in bear form in order to actually function. You can add a condition to the macro to first check if you’re in bear form (and if not, then cast it) before casting the desired spell.
This macro will:
- Check if you are in bear form, and if not will attempt to switch you to bear form.
- Will cast Growl at your current target
#showtooltip Growl
/cast [noform:1] bear form
/cast Growl
This macro will:
- Check if you are in bear or cat form and if not switch you to bear form.
- Check if you have an active focus target and if so will attempt to cast Skull Bash at it.
- Will attempt to cast Skull Bash at your current target.
#showtooltip skull bash
/use [noform:1/2] Bear Form;
/use [@focus,harm,nodead][] Skull Bash
Ursol's Vortex and Mass Entanglement macro
This macro is useful because Ursol’s Vortex and ![]() Mass Entanglement are mutually exclusive as they are two halves of a choice node, meaning they can share a keybind.
Mass Entanglement are mutually exclusive as they are two halves of a choice node, meaning they can share a keybind.
This macro will:
- Cast Ursol's Vortex at your cursor location if the spell is known
- Cast Mass Entanglement at your mouseover target so long as your mouseover is a hostile target and the spell is known
- Cast Mass Entanglement at your target if you do not have a mouseover so long as your target is a hostile target and the spell is known
#showtooltip
/cast [known:102793,@cursor] Ursol's Vortex;
/cast [known:102359,@mouseover,harm,nodead][known:102359] Mass Entanglement
Mighty Bash and Incapacitating Roar macro
Similar to the above, this macro is useful because ![]() Mighty Bash and
Mighty Bash and ![]() Incapacitating Roar are mutually exclusive being two halves of a choice node.
Incapacitating Roar are mutually exclusive being two halves of a choice node.
This macro will:
- Cast Incapacitating Roar if the spell is known
- Cast Mighty Bash at your target if the spell is known
#showtooltip
/cast [known:99] Incapacitating Roar;
/cast [known:5211] Mighty Bash
Soothe and Remove Corruption macro
It can be useful to macro certain spells that require mutually exclusive conditions together onto one keybind. The following does that using ![]() Soothe (requires an enemy target) and Remove Corruption (requires a friendly target). There are many different spells that this can be done with so simply change the name and possibly the conditions to suit your needs.
Soothe (requires an enemy target) and Remove Corruption (requires a friendly target). There are many different spells that this can be done with so simply change the name and possibly the conditions to suit your needs.
This macro will:
- Attempt to cast Remove Corruption at your current mouseover target if they are friendly.
- Attempt to cast Soothe at your current mouseover target if they are hostile.
- Attempt to cast Soothe at your current target
#showtooltip
/cast [@mouseover,help,nodead] Remove Corruption;
/cast [@mouseover,harm,nodead][] Soothe
Cooldown with trinkets macro
Macroing big cooldowns together with trinkets and cantrip effects is often a sensible idea, it makes things easier for you as the player since you only have to press a single key to trigger multiple effects that you would want to happen at the same time. This ultimately requires that all or all except one effect be off the GCD. It is generally best to not do this with trinkets that trigger GCD or channeling effects. Refer to the trinket section for info on which trinkets this is applicable to.
This macro will:
- Attempt to cast berserk or incarn (if talented).
- Use whatever trinket is located in Trinket slot 1 (top).
- Use whatever trinket is located in Trinket slot 2 (bottom).
- Use whatever cantrip effect is located on your Weapon slot
Delete rows as required before using this macro or you may not use the correct trinket slot with your cooldowns.
#showtooltip
/cast berserk
/use 13
/use 14
/use 16
Useful Addons
- TBC